Vintage

Monday, May 28, 2012

Captain America shield quilt

I have made it a tradition to make each of my brothers and sisters a quilt for their thirteenth birthday.  I am on the third (and last!) brother at this point.  When I asked him what color he wanted for his quilt, he said that he wanted it all red.  I flinched at this idea.  I mean, have you ever seen a red quilt?  ;)  The color would be a bit too much, never mind the fact that it would take forever to find fabric the same shade of red. ;)
So I decided that I would give my aunt a call.  She helped me think of other ways to express my brother's personality, but without the fiery color scheme.


This is what I came up with.
I drew two designs with Captain America (my brother's favorite superhero/Avenger) in mind. The one on the bottom is the design I went with.  If you use your imagination, it looks like the Cap's famous shield.

Fast forward a week or so.  This is what I had this morning.  My grandma told me about a specific kind of quilting about a year ago. The idea is to sew medium-size blocks separately. The quilt top is not sewn together until later. 

 I sewed the quilt top in four blocks.  I then cut the batting to fit the block.  The backing was cut slightly larger ( you'll see why this is important in a minute). Here is a picture of the layers. 

After the pieces are cut and pinned together, they can be machine quilted.  


I try as best I can to make sure the pieces are all even, but it doesn't always turn out perfectly.  :S  


 Another important thing to remember is to not machine quilt from edge to edge.  You must leave about an inch at the beginning and the end, as you can see here:


 When you have all the pieces quilted, you can begin to sew them together.  Lay the blocks with the tops facing each other.  Sew the batting and quilt tops together, but leave the backing alone.  When you have sewn them, it should look like this. 
 Trim the excess batting.

Lay the attached blocks with the top facing down. 


 Fold one edge over the other and pin it down.  This is why you left one inch all the way around each block not sewn.  Trim the fabric if the seam becomes too bulky for your machine.  After all, you don't want to break a needle! ;)

Here are the two halves coming together, a momentous occasion. ;)
Sorry the picture is sideways, by the way. 


And here is the completed quilt!  I am so glad that I am done with it.  I made several mistakes, including not buying enough red fabric (and going back to Hancock Fabrics twice) and even sewing two blocks together the wrong way!  


Despite these problems, I did manage to finish it in about ten days! My brother is really happy with it, and I think it will be around for a long time.  ;)

Sunday, May 27, 2012

The 1950s Day Dress Itself


 Here are some photos that my awesome brother took of me wearing my new favorite dress.  

 I've been wanting to make a dress like this for some time now.  I love it! It makes me feel feminine and pretty. 


 This is a bridge in a park.  It hasn't rained hardly at all this spring, so the creek is quite dry. ;)


 I am not being camera shy in this picture.  In fact, the very reason I wore my big hat is to hide my secret identity.  I am a college student by day and a spy by night, you see. ;) 

 I had to test the "jumpability" of the dress as well.  Another reason I like sewing my own dresses: I can make sure the skirts are long enough. 
 It was a fun photo shoot!  The day was beautiful and I'm so grateful that my brother took time on his birthday to take pictures of me. 
Have a great Memorial Day!

The Making of the 1950's Day Dress

So I decided that I needed to make a "proper" dress at least once this summer.  I wanted a vintage look, so I took out my Simplicity pattern (the one on the right). I've had this pattern for probably a couple of years.  I think I bought it when Hobby Lobby had a sale, so this pattern cost about two dollars.
Some marking paper and a wheel help tremendously!

Here is one section of the skirt.  I laid out the fabric and pattern on the ironing board to mark the darts.  There were a total of TWELVE darts on the skirt sections alone! 
Count 'em.  Twelve! 
 Needless to say, darts are tedious things and not my favorite technique in sewing.  However, they are slightly better than pleats, which I absolutely abhor.
 I used the pattern on the left to make sleeves.  I figured it would be cooler if I didn't have to wear a blouse underneath a sleeveless dress.  I tried to be creative with my sleeves, but it didn't work.  I wanted to gather them and put cute little buttons on the side.  However, the binding I made wasn't long enough and it didn't fit my arm.  So I trimmed the sleeves.
Bad angle.  Sorry.

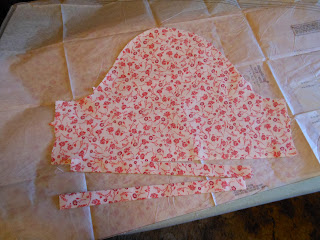
The odd angle of this picture is a result of me trying to hide how very messy my room was at this point.  Having an ironing board in my room didn't help matters much either. ;)  Anyway, this is the front bodice. The bodice was empire waist style.  After I had most of the dress completed, I discovered that the neckline was much too wide.  I decided to add yet more darts to the front and back of the neckline, as you can see from the pictures below.

The front darts as seen from the inside.

The front darts as seen from the outside. 
 The fabric for this dress was on sale at Hancock Fabrics.  I paid a grand total of $9.37, minus the patterns and zipper I had stocked up.  :)  
Pictures of the whole dress to come later!

Sunday, May 13, 2012

Mary Poppins!

Yay!  :D

(Warning:  It has just barely been 24 hours since I saw this, so excessive fandom will appear in this post, as well as some spoilers.  If you want to avoid spoilers, you should probably skip this post. ) Hey all!  I had a wonderful opportunity this weekend to see "Mary Poppins" with my cousins, aunts, and grandma in St. Louis.  We had a fantastic time!  I have listened to some of the Broadway album for the past year or so.  I have also watched numerous videos on Youtube.
  Anyway, the production was well done.  The story did deviate a bit from the 1964 movie with Dick Van Dyke and Julie Andrews.  To me though, the changes made sense.  For instance, in the movie Mrs. Banks was a suffragette, always eager to do anything for women to get the vote.  In the stage version, that part is cut out and replaced by a Mrs. Banks who is eager to be a good wife and mother.  If you think about it, the 1960s was a time of the women's revolution.  Women around the country strove to be treated like men.  They wanted to be a part of the workforce and to have more weight in society.  In the movie then this idea is very much a part of Mrs. Banks' character.
The decision of the writers to change this in the production makes for an interesting observation.  In the stage version, Mrs. Banks tries hard to be a part of the high society that she belongs to, but to no avail.  No one accepts her invitation to tea, leaving her feeling distraught and rejected.  This makes me wonder what the writers are trying to convey to their audience.  Are they suggesting that women have pushed beyond who they are meant to be?  Or are they simply suggesting that being popular and in power isn't for everyone?  What do you think?
The view from where I was sitting in the Peabody Opera House.  Isn't it just beautiful?
Now to the excessive fandom part of this post.  ;)  "Step in Time" was my favorite number.  I have been watching the video here for some time.  It was just amazing to see it in person! The dance was almost exactly the same, even with Bert tap dancing on the ceiling! We were so glad that he didn't fall!
I have also found the instructions for spelling out "Supercalifragilisticexpialidocious" like they do here.  It's a new challenge for me. ;)  Oh, and here are the directions.  Yes it is silly, but fun > silly.  :D

Mary Poppins herself was quite different than Julie Andrews' version.  She had a lot more "can-do" attitude, bordering on pride.  It was okay though; and seemed to fit her character better in this version.  The "Jolly Holiday" number was also a lot of fun and very colorful.  Everyone was dressed in flower-like colors, with Mary Poppins in bright pink! 
The children, Jane and Michael, were rotten.  Ugly.  Spoiled.  Just.  Horrible.  They did eventually change.  Actually the problem was their distracted father and overindulgent mother. Until the parents turned around, the children could not learn any better, as often happens in real life ("Supernanny" is on of my favorite shows. ;)
Bert was my favorite character.  He was an important person in the development of the story.  He was also a good comedic relief. ;)

Overall, "Mary Poppins" was great.  I loved every minute of it.  If ever you have the chance to see it yourself, I highly recommend it.  If not, there are plenty of videos and clips online. ;)

Have a Supercalifragilisticexpialidocious week!


Friday, May 11, 2012

A Lesson And A Challenge


     Sometimes we do not realize just how much we affect others around us.  We are like violets in a forest, bowing our heads to avoid being seen.  However, everything we do and say makes an impression on people.  We often think to ourselves that we do not matter much and that no one will pay any attention to us.  We want to hide.  I'm not talking about false modesty per se; what I am talking about is more like the unawareness of the power we have within ourselves.  We do not understand our true worth and what our capabilities are.  We have the ability to make or break friendships.  We have the ability to reassure strangers with a smile and a kind word.  Any small thing that we do has the potential to be something great. We must realize this power, and understand that we are called to use it.  We cannot hide in the shadows any longer; we must become great people.

     We have often heard it said that we should be Christ to other people, but do we really understand what that means?  It means a complete change of person and character. No matter if we are having a bad day, have loads of homework, or just going about our lives, we are challenged by God to show His love in everything that we do.  This is a very daunting task: one that must never be taken lightly.  It is also very humbling, because by showing God's love to others, we realize that we are not perfect.  We see that we do not have all the answers.  We must become Someone Else in order to bring about any good in this world and make our lives worthwhile.  Thirdly, it is a great lesson in trust, because we have given everything we will do in the future to God and His Kingdom.  Only good can come out of this imitation of God.

     So I urge you to think about how you show God's love.  Do you hide it in the infamous bushel basket?  Do you shy away when an good opportunity arises?  Will you show kindness to others, or look the other way when someone is hurting?

                                              What kind of impression will YOU make?